Motorcycle License Plate Light – DIY Replacement Guide
Fix your motorcycle license plate light in 30 minutes. LED swap guide for delivery riders covering tools, legal compliance, and staying on shift.
Motorcycle License Plate Light: Fast DIY Replacement for Delivery Riders
A burned-out plate light is a $100 ticket waiting to happen. I found that out the hard way getting flagged on Atlantic Avenue at 11pm with a full insulated bag on the back. Now I treat a dark plate light the same way I treat a flat tire. Fix it fast and get back on the road. This guide walks you through confirming the fault, picking the right LED, swapping it out, and running a basic legal check. All in under 30 minutes, all for under $20.
This is written for USA delivery riders. I cover direct LED swaps that need no splicing, basic wiring, and the compliance rules that matter for night work.
Step 1: Pre-Check - Do You Actually Need a New Plate Light?
Why It Matters
A dark plate at night is an easy stop for any cop working late shift. Depending on the state, that fine runs $50 to $200. Before spending anything, confirm the plate light is actually the problem and not a blown fuse.
How to Test in 3 Minutes
- Turn the ignition to running or accessory, switch the headlights on, then walk 15 feet behind the bike and look.
- If nothing lights up, pull the fuse panel and check the tail light fuse first. A blown fuse costs under a dollar and takes two minutes to swap.
- If the fuse is fine, pull the lamp cover and inspect the bulb. Burnt filament or blackened glass means the bulb is done.
- If you want to be certain about wiring, use a multimeter set to DC volts. Probe the power wire and ground with the bike on. You should read 12 to 14 volts at the power wire.
Replace vs Repair
- Replace the bulb when the filament or LED diodes are dead but the housing and wiring look clean.
- Fix the wiring when connectors are corroded or wires are frayed. Do not force a new bulb into bad wiring. The new bulb will fail just as fast.
- Replace the whole housing when the lens is cracked, mounting tabs are broken, or water pools inside. A leaky housing kills new bulbs repeatedly.
Before You Touch Anything
Take three phone photos: one wide shot of the tail section, one tight shot of the plate light housing, one of the wiring connector. These save real time when you are buying parts or putting things back together at the curb.
Step 2: Tools and Parts
What You Need
I keep a small zip pouch in my top box with:
- Phillips and flat head screwdrivers, small and medium
- 8mm to 12mm socket set
- Needle nose pliers
- Multimeter
- Heat shrink butt connectors and a crimper
- Electrical tape and a short roll of heat shrink tubing
That kit covers 90% of roadside plate light fixes without hunting down a shop.
Stock Bulb vs LED
A stock replacement bulb is the cheapest fix. An LED swap costs a few more dollars but lasts years longer and draws less current. I switched to LED permanently after replacing the same stock bulb three times in one winter. Not doing that again.
Choosing the Right LED
Four things to check before you order:
- Voltage: Must be 12V compatible. Most motorcycle electrical systems run 12 to 14V.
- Base size: Match the original bulb base exactly. Pull the old bulb and read the code on the base before ordering. Common ones are 1156, T10 wedge, or a bolt type used in smaller housings.
- Waterproof rating: IP65 or higher. Night deliveries in rain will kill anything less.
- Connector type: If the connector matches your socket directly, no splicing needed. If it does not match, budget for heat shrink butt connectors.
Products I Have Actually Used
SEALIGHT 1156 LED Bulb: around $16 for a pair. Plugs straight into 1156 sockets with no splicing. The one thing I don't love: on some bikes the ECU detects the lower draw of the LED and starts flashing a warning light. You fix it with a cheap load resistor, but it is an extra step nobody tells you about upfront.
Auxbeam T10 Wedge LEDs: around $12 for a pack of two. Good for smaller, tighter housings. The honest limitation is they run warmer than I expected for an LED, and I had one fail at around 18 months of daily riding. Fine for the price, not the longest lifespan.
Putco 1156 White LED: around $20 for a single. Better waterproofing and a construction built to handle vibration, compared to most budget options. The downside is price. You are paying nearly double for a plate light bulb, and on most bikes the SEALIGHT does the same job for less.
Buy a pack of two so you always have a spare on the bike.
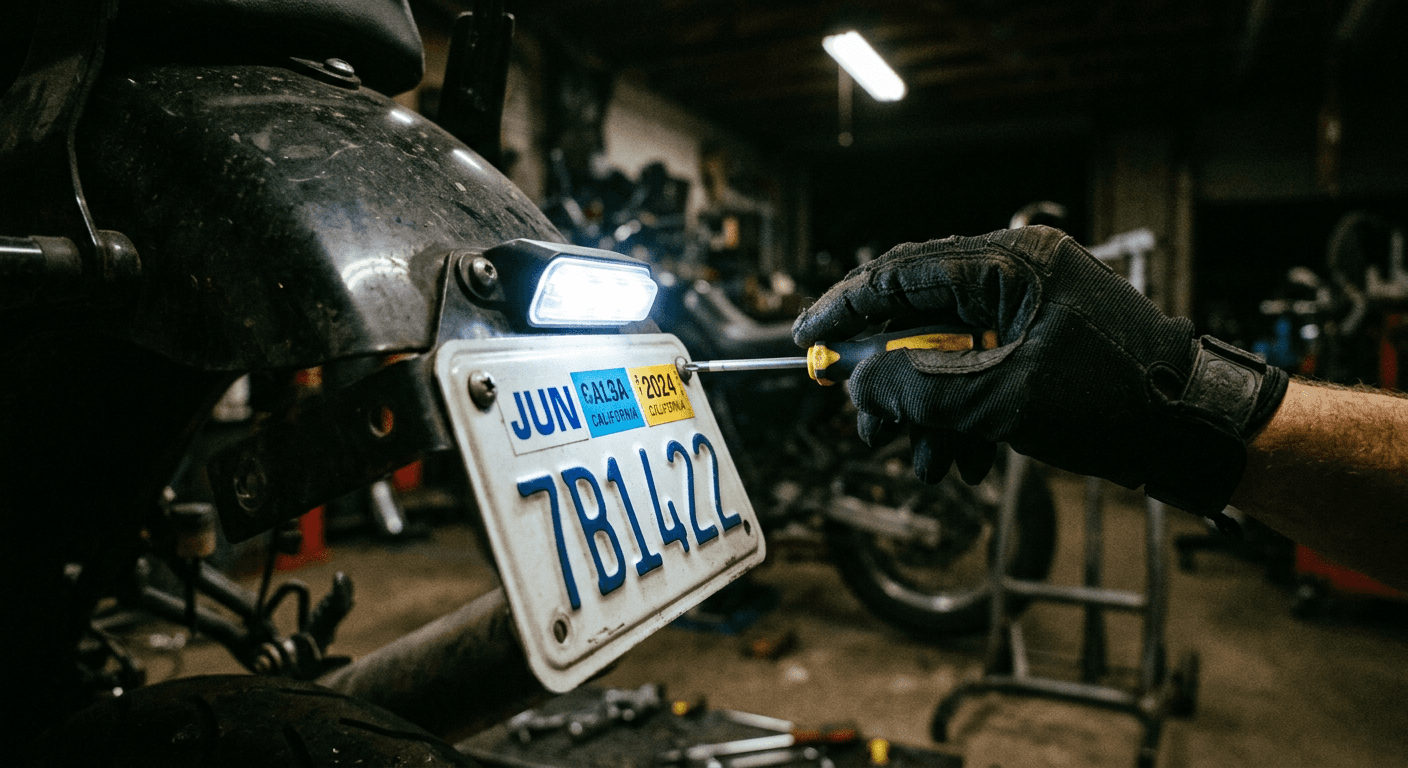
Step 3: Remove the Old Plate Light
Safety First
Park on level ground, set the stand, pull the key. For a simple bulb swap, ignition off is enough. If you are cutting or splicing wires, disconnect the negative battery terminal first.
Remove the Plate and Access the Housing
- Take out the plate fasteners and drop them in a small magnetic tray or zip bag so nothing rolls off the curb.
- Tilt or fully remove the plate to reach the lamp housing behind it.
- Take a quick phone photo of the screw order and wiring before pulling anything apart.
Identify the Wires
Most plate lights run two wires. Black or brown is ground. Red or a colored wire is the power feed for the lamp. If there is a connector, just unplug it. If wires are soldered, cut them leaving a short tail so you can identify each one later when you reconnect.
Getting the Lens Off Without Breaking It
Plastic tabs snap if you pry hard. Use a small flat screwdriver or trim tool and press each tab gently inward while lifting one corner at a time. Work around the housing slowly. If screws hold the lens on, remove those first before trying the tabs.
Step 4: Install the New LED Plate Light
Direct Swap
- Seat the new LED into the socket in place of the old bulb.
- Reconnect the plug. If the LED does not light, flip it 180 degrees. Polarity matters on some sockets and reversing it is the fix.
- Turn the ignition on and check illumination from 15 feet behind the bike.
- If it lights correctly, reassemble carefully. Make sure no wiring gets pinched under the housing when you close everything up.
Hardwired Installation
- Strip about 1/4 inch of insulation from both wire ends.
- Crimp heat shrink butt connectors over each join and shrink them tight. This seals out water without needing a torch.
- Confirm polarity before buttoning everything up. Wrong polarity on an LED means it will not light. It will not blow anything either, but check anyway before you reassemble.
Sealing Against Water
Apply a thin bead of silicone around the lens edge if the housing is not sealed from the factory. Do not pack sealant into the mounting holes. Snug the screws down firmly, but do not overtighten on plastic tabs. They crack and then you are buying a whole new housing.
When the Plate and Brake Light Share a Circuit
Some bikes run the plate lamp on the same circuit as the brake light. If yours does, use a multimeter and a helper on the brake lever to identify which wire is the running feed and which is brake feed before connecting anything. If you are not sure, buy an LED assembly built for dual use or take it to a shop. A wiring mistake here affects your brake signal, which is not a fix to rush.
Step 5: Test and Verify Legal Compliance
Brightness and Visibility Check
Park the bike facing a flat wall at night, about 10 to 15 feet away. Turn the lights on and look at plate illumination. You want even, white light with no deep shadows across the full plate. Walk back to 50 feet and confirm you can read every character clearly. That is the standard in most states.
What the Law Requires
Requirements vary by state but the basics are consistent:
- White light only over the plate; no color bleed from other lighting
- Plate legible from 50 to 100 feet at night (check your state DMV for the exact requirement)
- No tinted or colored lens obscuring the lamp
If you ride across state lines, aim for the stricter standard. It is one less thing to argue about at a traffic stop in Brooklyn or anywhere else.
Night Shift Compliance Checklist
Run this before every night shift:
- White light only, no color bleed
- Plate fully visible, no delivery bags or racks hanging over it
- Even illumination across the whole plate
- No tint or film over the lens
- Housing secured and wiring clear of moving parts
If a Cop Flags You
Carry a spare LED bulb and a couple of butt connectors. Most plate light violations can be fixed at the curb in ten minutes if you have the parts on you. A broken housing means a shop visit. If you are putting heavy mileage on the bike doing delivery work, keep a cheap universal housing in your kit.
Step 6: Troubleshooting
Light Still Dead After the Swap
- Check the fuse again. A faulty LED can blow a fuse on installation.
- Inspect the connector for corrosion. Spray contact cleaner and scrub with a small brush.
- Wiggle the connector while the bike is running to catch an intermittent connection fault.
Flickering or Dim Output
Poor ground is the usual cause. Clean the ground contact point down to bare metal and ensure solid metal-to-metal contact. Voltage drop from thin or long wire runs can also dim LEDs. Shorten the run or step up to a slightly heavier wire gauge.
Condensation Inside the Lens
Dry the housing out with compressed air or a hair dryer, then re-seal the edges with silicone. If water keeps returning, the housing has a cracked seam somewhere. A housing that leaks consistently will keep killing bulbs. Replace it and stop chasing the problem.
When to See a Mechanic
Replace the whole housing when tabs are snapped or the lens is cracked. Go to a shop when wiring issues go beyond simple connectors or when the same circuit on your bike keeps throwing faults after the fix.
Step 7: Maintenance and What to Carry
Weekly Checks
These take about two minutes and catch most problems before they result in a roadside stop:
- Visual check of plate illumination before any night shift
- Wiggle the wiring connector to feel for looseness
- Quick multimeter check. You should read 12 to 14 volts at the lamp with lights on
What to Keep on the Bike
- Spare pair of LED bulbs in the correct base size
- A few heat shrink butt connectors and a small crimper
- Mini screwdriver set and a few spare screws
- Small tube of silicone
With that kit I can sort a plate light issue at the curb and be back earning within 20 minutes.
Wrap-Up
A dark plate light is one of the dumbest ways to lose a shift. Check the fuse first, swap to an LED if the bulb is gone, seal the housing properly, and do a visibility test at night before you head out. If the wiring looks rotten or the fix doesn't hold after a week, get a pro. Do not let a $16 bulb cost you a full night's earnings.
For full replacement housing options and model-specific fit guides, see my Motorcycle Number Plate Light - Best LED Picks for Delivery