How to Lock a Bike with a U-Lock – Delivery Rider Technique
How to lock a bike with a U-lock in under 30 seconds. I will cover the exact technique, common mistakes, and fast routines for delivery riders on every stop.
How to Lock a Bike with a U-Lock: Fast Technique for Delivery Riders
Short stops are what make delivery riding different from commuting. I lock my bike 50 to 80 times a week, often for five minutes or less, always in public, always under time pressure. A slow or sloppy locking routine costs earnings and leaves the bike exposed longer than it needs to be. This guide covers the exact technique I use, how to handle different anchor points, and the mistakes that turn a good lock into a useless one. If you are still deciding which U-lock to buy, see the Best Bike U-Lock for Delivery Riders - 2026 Buying Guide first, then come back here for technique.
The Core Principle: Frame and Rear Wheel, Always Together
Everything else in this guide flows from one rule. The U-lock goes through the rear wheel and the frame triangle together, locked to a fixed anchor. Not just the frame. Not just the wheel. Both, every time.
The rear wheel contains the most expensive drivetrain components and carries the most replacement cost. More importantly, locking the rear wheel and frame together means the bike cannot be ridden or wheeled away even if someone removes the front wheel. A thief who defeats the lock has to carry the whole bike, which is slow and conspicuous. That is the threat model a U-lock is designed to beat.
Front wheel security is secondary. Use a short cable looped through the front wheel and around the locked shackle to deter quick-release removal. The U-lock handles the critical threat. The cable handles the opportunistic one.
Before Your Shift: 30-Second Setup Check
Run this before you leave. It takes 30 seconds and prevents mid-shift problems.
- Confirm the lock is mounted on the frame bracket with the keyway facing down on your dominant side.
- Test the key in the cylinder. If it sticks, lubricate before the shift, not during it.
- Check the cable is coiled in your seat bag or clipped to the bag strap.
- Put a spare key in a sealed pocket inside your delivery bag and keep it separate from your main keyring.
A bracket that rattles or a stiff cylinder at 10pm on a Friday costs you time you cannot get back. Thirty seconds in the morning prevents both.
Choosing the Right Anchor in 5 to 10 Seconds
This is the skill that separates riders who get bikes stolen from riders who don't. At every stop I am scanning for the right anchor before I even dismount.
Use these:
- Bike racks bolted to the pavement
- Thick steel signposts set in concrete, locked two inches above ground where the post is widest
- Parking meter bases, not the thin head
- Solid steel bollards that cannot be lifted
Avoid these:
- Chain-link fences. They can be lifted, cut, or unbolted from the post
- Thin decorative bollards or plastic racks
- Wooden posts or anything that wobbles when you push it
- Shopping cart rails
- Anything that shows signs of previous cutting attempts
The five-second test: push the anchor with your foot. If it moves or wobbles, find another one. If it looks rusted through or the mounting bolts are exposed, find another one.
The 30-Second Locking Sequence
Practice this until it is automatic. The goal is under 30 seconds from dismount to walking away.
Seconds 0 to 10: Position the Bike
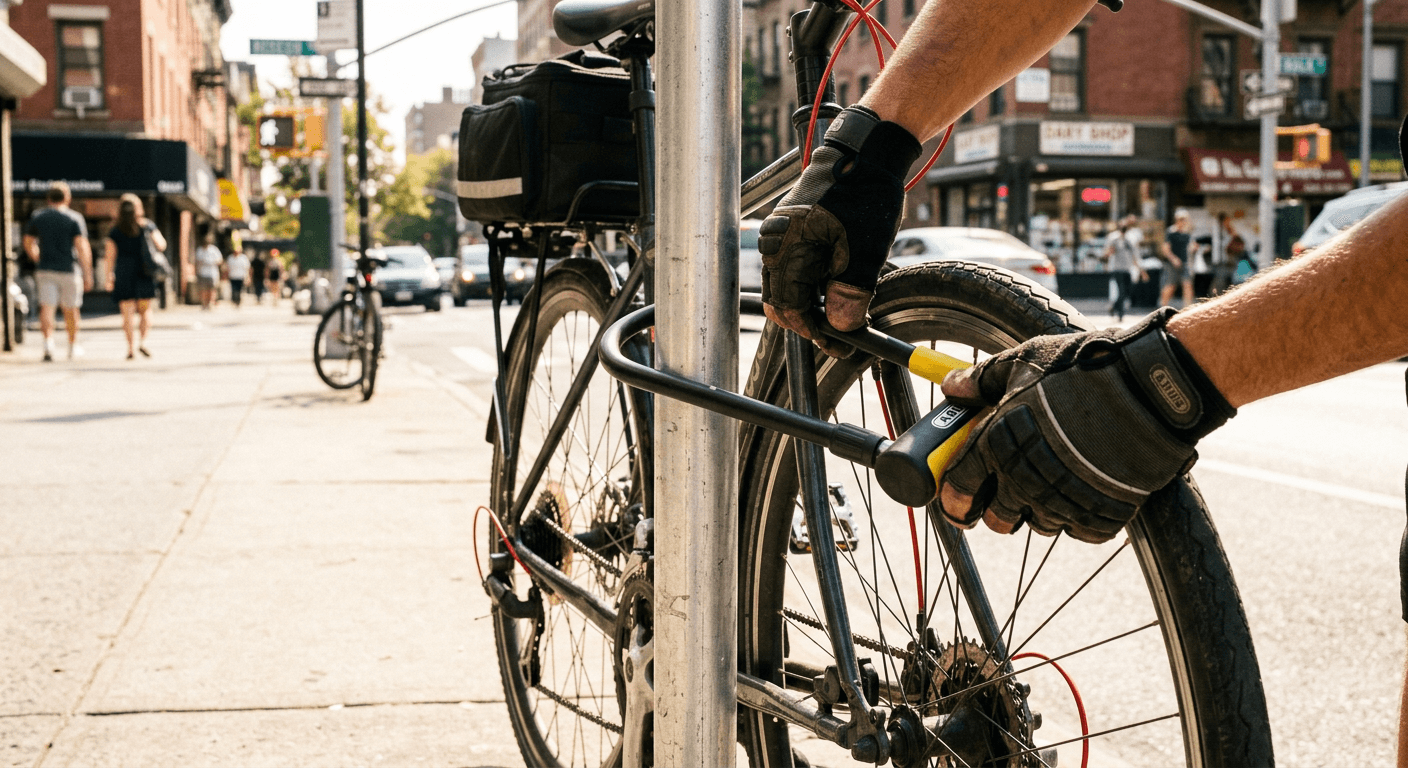
Roll the bike so the rear triangle faces the anchor and the rear wheel sits between the frame and the object. Pull the bike in close enough that the shackle can pass through the rear wheel, the frame triangle near the seat tube, and around the anchor with minimal empty space inside.
Seconds 10 to 25: Lock Frame and Rear Wheel
Open the U-lock and thread the shackle through the rear wheel, through the rear triangle of the frame at the seat tube and chain stay, and around the anchor in one smooth motion. The shackle should sit against solid frame tubing, not across spokes. Close the lock with the key and give it a firm tug. If it did not seat, adjust and try again.
Keep the empty space inside the shackle as small as possible. Every centimeter of empty space is leverage a spreading tool can use.
Seconds 25 to 30: Add the Cable and Go
Loop the cable through the front wheel and clip it to the locked shackle or anchor. Tuck the loose end so it does not flap. Pocket the key and move.
That is the full routine. Draw, thread rear wheel and frame, around anchor, close, tug, cable, go.
Locking to Different Anchor Types
Bike Rack
Thread the shackle through a solid horizontal or vertical rack bar, through the rear wheel, and through the rear triangle. Keep the shackle as low on the rack as possible so lifting becomes harder. If another bike is already locked to the same rack, push your rear wheel and triangle behind it to reach the rack bar. If that is not possible, use a post or meter within a few steps.
Signpost
Lock two inches above ground level where the post is embedded deepest in the concrete and the diameter is widest. Locking high on a signpost allows a thief to work from a seated position and gives them more cutting angle. Low is harder to attack and harder to remove even if the post itself is targeted.
Parking Meter
Use the base of the meter post, not the thin head. Thread the shackle around the base, through the rear wheel, and through the frame triangle. Parking meters are solid and deeply set but the heads can be removed by maintenance crews. Base only.
Handling Awkward Situations
The shackle won't reach both frame and wheel around a thick anchor: Position the bike at an angle so the rear triangle sits beside rather than behind the anchor. This shortens the path the shackle needs to travel. If it still won't close through both, lock the frame only and run the cable through the rear wheel.
The rack is full and the only space is a thin section: Check whether the thin section is part of a bolted rack that is anchored at a separate post. If so, use the anchor post itself. If not, find another anchor.
You are in a rush and there is nothing solid nearby: Lock to the best available option and minimize your time inside. A five-minute stop with a mediocre anchor is lower risk than a 20-minute stop. Do not leave the bike for longer than the anchor quality warrants.
The Mistakes That Turn Good Locks into Easy Targets
Too much space inside the shackle. This is the most common mistake. A loose shackle allows a spreading tool to be inserted and leveraged. Pull the bike as close to the anchor as possible before closing the lock.
Locking only the wheel. A thief removes the wheel, leaves it behind, and walks off with the frame. Always lock the frame and rear wheel together.
Locking only the frame. A thief removes the rear wheel and takes the frame with the wheel still attached to the lock. Same result, different route. Frame and rear wheel, every time.
Locking to the wrong object. The strongest lock in the world is irrelevant if the anchor can be cut, lifted, or unbolted. Spend five seconds confirming the anchor is solid before committing.
Keyway facing up. A keyway facing upward is easier to attack with picks and destructive tools. Always face it down.
Not testing the lock closed. A lock that looks closed but did not seat correctly opens with a firm pull. Always tug after closing.
Maintenance
Lubrication: Use graphite powder or a PTFE-based lock lubricant on the cylinder every few months. After riding in rain or salt, wipe down the shackle and keyway area. Oil-based lubricants like WD-40 attract dirt and gum up the cylinder over time.
Stiff key: If the key sticks on a shift, work it gently with small back-and-forth motions while applying light pressure. When you are back at base, clean and lubricate the cylinder before the next shift.
Rattling on the frame: Wrap the bracket contact points with a thin layer of handlebar tape or a rubber shim. A rattling lock is annoying and tells you the bracket fit is not tight enough, which means the lock can shift position during riding.
When to replace: Replace the lock if the shackle shows deep gouges from cutting attempts, if the cylinder sticks despite lubrication, or if the bracket fails and the lock is dropping. A lock you leave at home because the bracket failed is not protecting your bike.
The 60-Second Recap
- Scan for a solid anchor before you dismount
- Position the rear wheel and triangle against the anchor
- Thread the shackle through the rear wheel, frame triangle, and anchor
- Minimize space inside the shackle
- Close, key, tug
- Loop the cable through the front wheel
- Keyway facing down every time
- Never lock to chain-link, wood, or anything that moves when pushed
Practice the sequence at home until it takes under 30 seconds. After two weeks it becomes automatic and you stop thinking about it. That is when it starts saving your bike.
For specific lock recommendations matched to your city risk level and budget, see the Best Bike U-Lock for Delivery Riders - 2026 Buying Guide. For the U-lock versus chain lock comparison, see the Bicycle U-Lock vs Chain Lock - Which Is Better for Delivery?